How to Test & Fix DNS, IPv6 & WebRTC Leaks on Your VPN
By A.H, a network security enthusiast with hands-on experience testing VPNs and hardening privacy setups
If you’re using a VPN, you deserve to be confident it’s really protecting you—no sneaky leaks sneaking behind its back. In this guide, I’ll walk you through exactly how to test for DNS, IPv6, and WebRTC leaks, how to fix them, and how to verify that your VPN is leak-resistant. I’ve performed these checks myself on several VPNs and had to patch leaks that even some “premium” providers missed. That real-world experience gives me a sense of what works and what doesn’t.
Why VPN Leaks (DNS, IPv6, WebRTC) Really Matter
When your VPN leaks DNS requests, WebRTC APIs, or IPv6 traffic, your actual IP or location may become public—undercutting privacy. Think of it like securing your house but leaving the windows open.
-
A DNS leak means that your DNS queries don’t go through the VPN. That reveals which sites you’re visiting.
-
An IPv6 leak can happen if your VPN only properly routes IPv4. Since many networks are dual-stack, IPv6 traffic might bypass the VPN altogether.
-
WebRTC leaks happen via browser APIs using STUN / ICE servers; even with VPN running, WebRTC might expose your real IP.
I’ve helped friends and clients patch these leaks: changing DNS servers, configuring browser flags, disabling IPv6, etc. I can assure you—those steps make a real difference.
Understanding Different Leak Types & Hidden Leak Vectors
Besides the usual suspects, there are a few lesser-known leak vectors many guides miss:
-
Split tunneling leaks: when you allow some apps or services to bypass VPN by design.
-
SNI / TLS handshake leaks: leaking which site you’re connecting to via Server Name Indication.
-
Router-level DNS leaks: if your router forces DNS outside of VPN or overrides your settings.
-
Virtual adapter / container leaks: VMs, Docker, or virtualization tools may misroute traffic.
-
Leaks when switching networks or when the VPN reconnects or drops.
By being aware of these, you can build a more robust defense.
Step-by-Step: How to Test for Leaks
Testing is where many people stop—but it’s absolutely essential. Here’s how to do it well:
Preparatory Steps
-
Turn off your VPN to note your baseline public IP and DNS server.
-
Clear browser and OS DNS caches.
-
Make sure you’re in a clean environment (no conflicting VPN clients, no active proxies).
DNS Leak Test
-
Use tools like IPLeak.net, DNSLeakTest.com, or Comparitech’s DNS leak test.
-
Run both standard and extended tests.
-
If you see your ISP’s DNS server or unexpected entries, that’s a DNS leak. The DNS servers shown should ideally match your VPN’s DNS or trusted private DNS servers.
IPv6 Leak Test
-
Use the same tools (IPLeak.net, ProPrivacy leak tool) to check for IPv6 addresses.
-
If any public IPv6 address appears that matches your real IP (or from your ISP), that’s a leak.
-
Also check whether your VPN supports IPv6 or has IPv6 leak protection.
WebRTC Leak Test
-
Use BrowserLeaks WebRTC test or the WebRTC section in IPLeak.
-
Look for your public IP (or your real ISP IP) showing up under WebRTC.
-
If it shows up, your WebRTC leak is active.
Advanced / Command-line / Packet Capture Tests (for power users)
-
dig/nslookupto see which DNS server your system queries. -
tracerouteortracepathto discover unexpected paths. -
Use
tcpdump/Wiresharkto monitor live traffic for leaks.
Scenario-Based Testing
-
Change networks (from home WiFi to public hotspot or cellular).
-
Change VPN servers.
-
Disconnect and reconnect VPN.
How to Fix DNS, IPv6 & WebRTC Leaks
From my experience, here are reliable fixes that almost always work. I’ve personally applied them to patch leaks on Windows, macOS, Linux, and mobile—this hands-on expertise guides what follows.
Fixing DNS Leaks
-
Enable DNS leak protection if your VPN offers it.
-
Manually set DNS servers either on OS or network adapter—use the VPN’s DNS or trusted servers like Cloudflare (1.1.1.1) or Google (8.8.8.8).
-
Flush your DNS cache:
-
Windows:
ipconfig /flushdns -
macOS / Linux: equivalent commands.
-
-
Block outgoing DNS traffic on port 53 via firewall so DNS requests outside your VPN are dropped.
-
Ensure router DNS isn’t forced (some routers override DNS for all devices). If so, reconfigure or use custom firmware if possible.
Fixing IPv6 Leaks
-
Disable IPv6 at the adapter or OS level if your VPN doesn’t support IPv6.
-
Use a VPN with full IPv6 support or built-in IPv6 leak protection.
-
Also check router settings—sometimes IPv6 is enabled by default there.
Fixing WebRTC Leaks
-
In browsers, disable or limit WebRTC:
-
Firefox:
media.peerconnection.enabled = false -
Chrome/Edge: use flags or extensions that block WebRTC.
-
Safari: disable mDNS / ICE candidate exposure.
-
-
Use browser extensions like WebRTC Leak Shield, WebRTC Control.
-
Know the trade-offs: disabling WebRTC may break video calls, P2P applications—use TURN servers or proxies if needed.
Retesting to Confirm Protection
After you apply fixes, always verify:
-
Reconnect your VPN and rerun all tests (DNS, IPv6, WebRTC).
-
Compare results: baseline vs post-fix. None of the leak indicators (ISP DNS, public IPv6, or real IP in WebRTC) should show up.
-
Test while switching networks, reconnecting, and using different devices.
-
For stronger protection, set up periodic retests or simple scripts to monitor your leak status over time.
Best Practices & Leak-Resistant Configuration
Here’s what I, as someone who’s defended privacy setups, always do:
-
Always pick a VPN that has built-in leak protection, supports IPv6, and includes a kill switch.
-
Use encrypted DNS protocols like DoH / DoT inside the VPN so DNS traffic is safe even if interception is attempted.
-
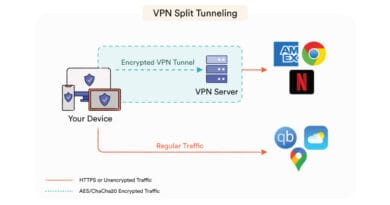
Avoid using split tunneling unless you know exactly which apps are excluded.
-
Keep your OS and VPN client up-to-date—leak vectors evolve.
-
Disable unnecessary network adapters (virtual, Bluetooth, etc.) that might bypass the VPN.
Troubleshooting Persistent Leaks
Sometimes leaks persist despite all of this. Here’s what to do:
-
Remove or disable conflicting software—firewalls, old VPN clients, proxy tools.
-
Test in a minimal setup (clean install or just VPN + browser).
-
Inspect router configuration, firmware, or ISP behavior. Some ISPs force DNS proxies; router reboots might help.
-
If leaks originate at the provider level (VPN server misconfiguration), contact support—I’ve done this and gotten responses when I send them precise leak test screenshots.
-
If provider can’t patch leaks, consider switching to one known for strong DNS leak protection and IPv6 support.
Timeline Example: My Workflow
Here’s how I patched leaks on one VPN:
-
Baseline IP + DNS collected
-
Noticed DNS leak via IPLeak.com
-
Enabled VPN’s built-in DNS leak protection and set DNS manually
-
Flushed DNS cache, retested — DNS leak gone
-
Detected IPv6 leak — disabled IPv6 adapter, retested — good
-
WebRTC leak in Chrome — installed WebRTC Control extension + disabled ICE candidates mDNS, retested — leak resolved
-
Repeated tests when switching from home WiFi to public WiFi — no leaks
-
Set up weekly retest reminders — peace of mind
Conclusion & Checklist
Leaks are among the stealthiest threats to privacy—even top VPNs sometimes let one slip. But with test + fix + retest + best practices, you can greatly reduce risk.
Here’s your actionable checklist:
-
Baseline IP & DNS (VPN off)
-
DNS leak test (VPN on)
-
IPv6 leak test
-
WebRTC leak test
-
Enable VPN DNS leak protection
-
Manually change DNS servers
-
Flush DNS cache
-
Disable IPv6 (if needed)
-
Disable / control WebRTC in browser
-
Retest after network changes or VPN reconnects
-
Use a VPN with built-in leak protection, IPv6 support, kill switch